
Cats. You either love them or you hate them. I personally have a love/hate relationship with my two children. Most days they are cuddly and cute. Other days the incessant meowing (and peeing in my Longchamp bag) morphs me into Mommie Dearest and I start screaming about wire hangers. Since it's the season to be thankful, and I'm most definitely thankful for my two babies Rajah and Rishi, it is high time I do something nice for them (aside from the occasional salmon treat), thus I set about making them their dream bed.
I was at the thrift store a few weeks ago, when I spotted a set of pukey green suitcases. Obviously the first thought that enters my head is 'Can I afford $2 suitcases?', the second thought was CAT BED! The suitcase cat beds have been around for years, but I never arrive on time so why start now? I didn't use a tutorial for this project, I just went off the pictures I remembered seeing in the past, however some of my favorites were Kristen's from Green, it's the new blue (you can find the tutorial here) and Claire's American tourister bag. These girls know how to let a pet sleep in style!
 No Sew Suitcase Pet Bed Tutorial


I know my kitties are thankful for their new resting spot. What are you thankful for this holiday season? Happy Thanksgiving, enjoy your friends and family and whomever you choose to spend the holiday with! I know I for one cannot wait to get my hands on a turkey sandwich.....
I was at the thrift store a few weeks ago, when I spotted a set of pukey green suitcases. Obviously the first thought that enters my head is 'Can I afford $2 suitcases?', the second thought was CAT BED! The suitcase cat beds have been around for years, but I never arrive on time so why start now? I didn't use a tutorial for this project, I just went off the pictures I remembered seeing in the past, however some of my favorites were Kristen's from Green, it's the new blue (you can find the tutorial here) and Claire's American tourister bag. These girls know how to let a pet sleep in style!

Supplies:
-Old suitcase
-4 Feet (thrifted, re-purposed, whatever…) I used wooden doorknobs that I got from Ace Hardware for $1.79/4
-E6000 glue
-4 Feet (thrifted, re-purposed, whatever…) I used wooden doorknobs that I got from Ace Hardware for $1.79/4
-E6000 glue
-Paint (for feet, if necessary)
-Stapler + Staples
-Stapler + Staples
-Scissors
-Foam Craft Board
-Fabric
-Batting and Foam (I used remnant batting and foam from my headboard project)
-Foam Craft Board
-Fabric
-Batting and Foam (I used remnant batting and foam from my headboard project)
Optional Cat Banner: Burlap, jute rope,
and sharpie marker
Instructions:
1. Cut the
foam craft board to the size of the width and depth of the bottom of the suitcase.
This will serve as the base of your pillow

2. Cut the Foam Stuffing to the length and width of
your foam craft board. I used multiple
layers of foam to create the desired height (Mine was about an inch
taller than the depth of the bottom of the suitcase). Glue the layers of foam
together + to the base of foam craft board.

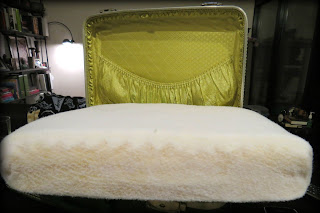
3. Cut batting so that it can be
draped over the foam + foam craft board.
Staple the batting to the underside of the foam craft board.

4.
Do the same procedure with the fabric of your choice.

5.
Paint legs with color of your choice.
Secure legs to underside of the suitcase using E6000 glue. You may want
to consider sanding the contact points first for best adherence (don’t paint the
portion that will be glued, for a better
stick).

5. Optional: Make a banner using
burlap (or any other choice of fabric) cut into triangles, and then stapled
onto a piece of jute rope. I stenciled
letters onto my burlap using black and blue sharpie markers. I secured the banner into the corners of the
suitcase using safety pins.

The final product:


 |
| Rajah thinks his new bed is boss. |
I know my kitties are thankful for their new resting spot. What are you thankful for this holiday season? Happy Thanksgiving, enjoy your friends and family and whomever you choose to spend the holiday with! I know I for one cannot wait to get my hands on a turkey sandwich.....
No comments:
Post a Comment