Saturday, December 7, 2013

2013 Stocking Stuffers

Oh Screwdrivers and Stethoscopes, how I’ve neglected thee.

I haven’t abandoned my little blog, I promise.  Life has just gotten in the way.  Weddings.  Jobs.  Holidays.  Repeat. I promise I will have some great posts coming up on the things I have been up to, but in the meantime, let’s discuss 2013 stocking stuffers.

Here are some affordable little stuffers sure to make Santa do a double take:

For the fashionista:

Polka Dot Winter Tights- $9.80
In the cold of winter (last I checked it felt like -9 degrees) you can’t exactly go bare-legged.  Solution:  adorbs tights.
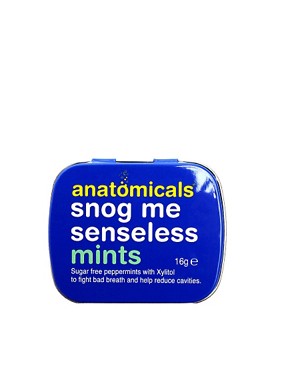
Anatomical Snog me mints- $2.81

Okay not exactly fashion, but I just love things that come in little packages. Plus I love all things Brit. And nice breath isn’t a bad quality either.

For the techie:
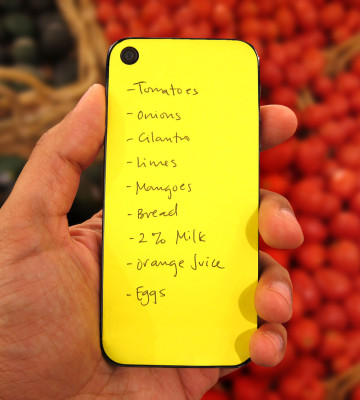
Ilovehandles  iPhonePost It Case- $7.95

I love this.  How often do you need a piece of scratch paper, and don’t have one?  For me that’s basically every day.  Note to self: stop taking so many notes. Note to self: get an iphone.

Eye-Fi Wireless SD Cards-$49 and up
So these guys are a little more expensive, but where they lack in affordability, they make up in awesomeness.  I don’t know about you, but I have pictures on my camera’s memory card dating back to 2008.  I love toting my camera to events, but never seem to manage to upload the pictures to my computer.  The solution: the Eye-Fi series, which wirelessly transfers photos from your digital camera directly  to your iPad, iPhone, Kindle, Computer, etc.

For the foodie:
Sriracha Candy Canes- $7.99
I haven’t been too fond of candy canes ever since that time I got the “stomach flu” after consuming them in bulk (Yes, I realize there is no such thing as “stomach flu” and yes I realize consumption of candy canes and gastroenteritis are generally unrelated).  HOWEVER, I might consider nomming on one or two of these strange yet intriguing candies!

Pluck Egg Yolk Separator- $12.99
I’m not sure if this is just an elaborate turkey baster or what.  But either way, I know for sure I always end up picking pieces of egg shell out of my cake batter because I have no idea how to separate egg yolks from the whites.  Enter the Egg Yolk Separator.  You’re welcome.

For the athlete:
Chicago Skyline White Sox Knit Hat- $20
Okay, so this is a shameless selfish suggestion, since this hat represents two of the things I hold dearest to my heart:  Chicago and the White Sox.  This hat is perfect for the days you want to exercise outdoors, but don’t want bright red painful Rudolph ears (you know what I’m talking about!?  Or is it just me…)
Contigo Autoseal Kangaroo Water Bottle-$12
So I ALWAYS have the dilemma of what to bring to workout.  My keys? I really don’t want to be locked out of my apartment, but I don’t want to carry the stupid things around.  Same goes for my ID and Credit Card. You just never know when you are going to need spontaneous retail therapy. 
The Contigo water bottle solves all of my problems.  And hydrates me, which is especially important when I’m out of breath and wheezing because I haven’t been to the gym in a month….but that is a whole different problem…..


 So there you have it...now get to stuffing!


Monday, June 3, 2013

Summer Skin 101

May was the month that came and went.  I packed, I moved, I cleaned, I repeated. There has been so much going on that I haven't taken any pictures or uploaded any of the projects I have been working on, but I promise next week someday I'll get around to it. Until then, I'm going to focus on the "stethoscopes" part of this blog that I so often neglect.

As the weather starts to get warmer I've noticed hem lines getting shorter and skin tones getting darker.  I *cringe* at the thought (my cellulite and paper white legs only being two very small reasons....).  The main reason I start to cringe is carcinoma.  That's pretty much just a fancy word for cancer.  The second HUGE reason I grab a jacket and a wide brimmed hat when I go outside is rhytids.  Again, pretty much just a fancy word for wrinkles.

Consider this my public service announcement.  If you don't want to look like a hairless cat by the time you're 35, you should take the time to do a few things before you enjoy the sweat inducing summer temps.

  1. Wear sunscreen.  Everyday.  Even if you're not planning to go outside. Reapply often and  when purchasing look for broad-spectrum sunscreen with UVA and UVB protection and an SPF higher than 15.
  2. Want to avoid crows feet (those cute little wrinkles extending from the corners of your eyes)?  Wear sunglasses every time you drive, go outside (they also help to prevent those pesky things called cataracts)
  3. Unless you want to look like Patricia Krentcil a.k.a. tanning mom, never ever ever step foot inside a tanning salon (I KNOW- I went through a period of time where Snookie had NOTHING on me.  But do as I say and not as I do.  My skin will definitely be paying for my stupid mistakes in the near future). Want to look tanned but want to avoid the salons? Invest in some nice non-stinky non-orangey self tanning solution.  The self tanners/bronzers have come a long way (I use Loreal's Sublime Bronze..it's cheap, it does the job, and I turn brown without all of the associated risks) 
Here is Oprah's guide to the best new bronzers, big O is never wrong is she?

4.  Go all boho chic this summer meaning, look like a homeless person and grab as many layers as possible.  Wear a wide brimmed hat.  Wear sunglasses.  Wear a light weight cardigan.  Basically cover up.  Leave something everything to the imagination. 

5.  If you ever notice a mole that seems to not go away or keeps getting bigger, a lesion that doesn't heal, etc....go see your dermatologist or local PA.  Trust me, these are not things you want to put by the wayside.  Look for the A,B,C,D,Es of skin cancer: Asymmetry, Border irregularity, Color change, Diameter enlargement and Evolution/Elevation.

Follow these guidelines and you'll continue to look flawless for years to come.  If you don't then you *might* be paying me a visit soon that expected.

P.S.  Wondering what a hairless cat looks like?  Totes not cute.  Stay out of the sun yo.


Friday, April 26, 2013

DIY Picture Ledge...on the cheap


Tis the end of April, and you know what that means?  FRANTIC SEARCHING FOR A NEW APARTMENT.  My current lease is up at the end of May, and even though I love my current place, it’s time for a change.  So that being said, I should probably post some of the things I have done around the place to make it look snazzy. 


I live in a loft, which means a whole lotta ceiling space (and echo potential, so don't make any noises you don't intend for anyone else to hear...including bodily functions...dad...).  What to do with all that excess wall?  Build a picture ledge of course.  I can’t take credit for this project, as I basically copied it from Ana White’s tutorial found here.   Basically, the shelf is made out of 8 foot long 1x2’s and 1x4’s. I bought the pre-primed boards, which cost an extra $5 but saved me in paint for a grand total of $18.  Cheap and easy just the way I like it (Sure beats Pottery Barn’s picture ledge, which looks the same and costs $110).


After assembling and mantling the picture ledge, fill it with artwork and other treasures.  I purchased all of my frames at IKEA or second hand.  Frugal Tip: Take the maps provided for free from the CTA and frame them.  I also purchased fun wrapping paper squares from Dick Blick and framed those too!  The paper only costs $3-5 and fits perfectly in a $5 IKEA frame.

Now you have no excuse for your bare ugly walls, so get to it.

Friday, March 29, 2013

{DIY Gift Wrap} Part 3: Personalized Paint Swatch Gift Tag


Hi my lovelies, sorry for the hiatus in gift wrap posts (I know, I know, HOW EXACTLY are you supposed to wrap your abundance of gifts without a new weekly tutorial???).  The last few weeks have been just too stressful and depressing for me to concentrate on my blog, but life must go on.

I’m going to cut to the chase; today’s tutorial is the paint swatch gift tag.  I hate spending money on gift tags, and I love me some free stuff.  If you’re a cheaparse thrifty like me, you’re going to love this tutorial.   Every time I’m at the Depot or Lowes I take the opportunity to collect my favorite color paint swatches; you just never know when they are going to come in handy.  My local Ace Hardware limits the amount you can take to 5…..the last time I was there I snatched 7 swatches. My palms underarms were sweaty and I was looking over my shoulder like a paranoid schizophrenic and/or meth head….I need to get out more.


Anyways, for this tutorial all you need is:
·         Paint swatch that has multiple colors (not just a solid square paint swatch….it will work but won’t look as fancy…)
·         Memories Slice Cutter (or similar)
·         String/Ribbon (to tie the gift tag to your package)

So basically, you just need a paint swatch with enough colors to spell out the person’s name that you’re gifting.  Example (Katie- Need at least 5 colors, if there are more you can cut the end colors off to shorten to swatch to 5 colors.  For this tutorial I spelled the name Masato, hence 6 letters/colors)


Really this is pretty self explanatory.  Center the slice on each paint swatch color and cut a different letter per color.  Easy peasy.  Attach the tag to the package with string or ribbon and you’re done.  (sorry this package looks a little…Christmassy….that’s probably because it was a Christmas gift…)

Wednesday, February 20, 2013

{DIY Gift Wrap} Part 2: Grocery Bag/Contact Paper Gift Wrap

Time for installment numero dos of the wrapping paper tutorials.  Today's tutorial makes use of contact paper, for personalized wrap! This one is mainly for those awesome people who own a slice or die cutter. You can always cheat and buy sticker letters, but where is the fun in that?


As everyone knows, I’m cheap.  I pretty much refuse to buy wrapping paper.  Paper bags of all varieties are my solution (I actually prefer brown paper bag wrapping to colorful wrapping paper…).  Thus, this gift wrap was accomplished using:
  • ·         1 brown paper grocery bag
  • ·         Leftover contact paper
  • ·         Slice machine
  • ·         Tape
  • ·         Scissors

Step 1: Wrap the gift with the brown paper bag

Step 2: Use the slice machine to cut out sticker letters using the contact paper.  I wrapped this gift for a birthday, but obviously you can use any phrase or slogan your little heart desires

Step 3: Arrange letters, remove backing, and place sticker onto the wrapped package


Step 4:  Make a bow out of the left over brown paper bag, using the tutorial found here

Step 5:  Give gift to birthday boy/girl, and watch them ooh and ahh over your pretty wrapping.  Then watch their look of disappointment when the gift isn’t as nice as the wrapping…womp womp….

Stay tuned for more wrapping tutorials!

Thursday, February 14, 2013

{DIY Gift Wrap} Part 1: Wine Bottle Wrapping (FREE!)


Happy Valentine’s Day lovelies! I hope you have amazing plans and are spending your day/night with that special someone.  I also hope you got said special someone a little token of appreciation.  Me…ermm…I haven’t gotten poor Nishy anything yet…but I still have a few hours before date night and I work in a mall.  So, fear not Sean, you will have a perfectly wrapped token of my love in T minus 4 hours.

Speaking of perfectly wrapped…are you wrapping illiterate? If so, today’s tutorial will be of use.  I love gift wrapping.  There is nothing quite like a gift that is wrapped with all of the bells and whistles.  Let’s face it: no one likes getting a gift that is wrapped in a plastic bag; it gives you the impression that the giver didn’t put much thought or effort into the gift (ahem DAD).  So to help all of you lazy ol gift wrappers out, over the next few posts I'll be highlighting some of my fave wrapping tutorials : )


Today's tutorial:  the Wine Bottle Wrap
I feel like I'm cheating with this post since it's so simple, but rather than pay $4.99 for a gift bag, just customize the brown paper bag you get for free with the purchase of wine/alcohol.  I used stamps, tissue paper, and curling ribbon.  Easy peasy (and FREE, so feel free to spring for the $$$$ wine, instead of the boone's farm...)


Enjoy your romantic night ya'll!  Check back later for more gift wrapping ideas : )


Friday, December 28, 2012

New Years Party: Appetizers


My favorite part about the holidays is the build up to Christmas.  The warm fuzzy feelings that you get walking past the Marshall Fields Macy’s Windows, or listening to the Red Cross Santas’ bells.  It’s semi depressing when the holidays are over, and you have no more Christmas music to listen to or holiday movies to watch.  But hey, life must go on.

Now that Christmas has passed, it’s on to the next:  New Years.   This year I keep putting it to the back of my mind;  I absolutely do not feel like planning my New Year’s events. 
 
I’m considering spending the holiday at home with a bottle of Prosecco, and a delivery pizza.  Go ahead and call me the New Year’s Grinch.  If you’re thinking of hosting a little soirée, and pizza won’t quite do the trick, here are some appetizers that will be quick and delish: 


What are your plans for the New Year?  Have you decided on a resolution yet?  I don't have a resolution as much as I have an order to not look like an obese bridesmaid.  I have 7 months to lose one third of my body weight.  Guess I better eat as many appetizers as possible before the new year!

Friday, December 21, 2012

{25 Days of Christmas} Holiday Cocktails


If you’re having a holiday soirée this weekend, I’m sure you already have the Christmas lights up, the cookie plate out, but what about the cocktails?  If all you have is the nog, here are some holiday cocktails ideas that will be sure to make you warm and merry:


Left Row (Top to Bottom):
Center:  
Right Row (Top to Bottom):

Enjoy! Hope everyone has fabulous plans, and remains safe this holiday weekend!

Thursday, December 20, 2012

{25 Days of Christmas} 9 Budget Friendly DIY Gift Ideas


I already mentioned one thrifty Christmas gift idea, with my hot cocoa post, but what are some other Christmas gift ideas for when you’re on a tight budget and want to be creative?  I can’t post all of my ideas since some people haven’t gotten their presents from me yet.  But, below are some of my favorite gift ideas for the DIYer with a small wallet and a little free time: 


Top Row (Left to Right):
Center Row (Left to Right):
Bottom Row (Left to Right)

Do you have any DIY gifts you would like to share?  Feel free to email me if you do, I would love to share on my blog!

Wednesday, December 19, 2012

{25 Days of Christmas} DIY Christmas Cards


Christmas:  The time to scramble around and send out last minute Christmas cards.  Oh wait, that’s just me.  Most people are on top of things and have their cards out in early December.  I, on the other hand, mailed mine…erm….today.  Whatever, getting your Christmas card after Christmas…NBD.   You’ll live.

So, for the past few years I have tried to make my own cards.  I have never really been one for scrapbooking; I don’t have a silhouette or a cricut. I love the look, just don’t have the tools. So I usually have to be resourceful.  This year I used leftover cardstock and a stamp.  As usual, I inflicted my rotten humor onto my friends (Home Alone anyone?).  I just can’t handle sappy quotes.  Not my style.


Here are some cards that my Christmas cards are jealous of.  So much prettier and better thought out:

Right (Top to Bottom): 

If you haven't sent out your Christmas cards yet, you should probably get to it!  Only 6 Days left till the big day!

Tuesday, December 18, 2012

{25 Days of Christmas} DIY Glitter Bamboo Tree


When I started decorating for the holidays, I spotted a gorgeous holiday decoration at Nordstroms.  Of course my first thought is that I could make a cheap version of the same tree (even though it wasn’t THAT expensive).  This project would be easy to make with the kiddos. 


Materials Needed (Makes a 10” Tree):
3 Craft Foam Sheets
1 10” Bamboo Skewer
1 Small Paper Plate
Glue Gun
Elmers Glue
Gold Glitter Paint/White Glitter
Gold Paint
Scissors
Leaf Print Outs of Various Sizes (Small, Medium, Large)

Directions:
1. Print out the shape of leaf you want for your tree, and glue onto the foam with elmers glue. If you have a fancy printer, perhaps you could print directly onto the foam, however I do not, so glue it was. You could also consider free hand drawing or cutting the leaves.  I used three sheets of foam, and that was just enough leaves (I had a few leftover).


2. This is where the kids are handy!  Get some kid friendly fiskars, and cut the leaf shapes.  Once cut, remove the paper print backing.

3. Apply glitter glue and glitter to each leaf (I used glitter glue and glitter, but you could just skip this step, or apply your elmers glue and glitter)


4. Take your paper plate and cut off the paper rim, so all you have left is a dome (if turned upside down).
5. Paint the bamboo skewer and the  bottom side of the paper plate gold.


6. Once the paint and the leaves are dry, start assembling.  Just take the leaf and skewer it up the stick. Assemble from smaller leaves first, finishing with larger leaves.  There is no need to glue the leaves on, as the hold is adequate from just skewering.

7. Move bunches of leaves about ¾ inch apart, so it looks like a Christmas tree.
8. With the paper plate gold side up (making a dome), punch the pointed end of the bamboo skewer through the center of the plate.

9. Hot glue the bamboo stick on the now bottom of the plate (the non gold side).  Allow to cool, and then sit it upright, and you have a foam crafty Christmas decoration! 


Here is the foamy goodness result:


 Only one week left till Christmas!  It's crunch time folks!


Monday, December 17, 2012

{25 Days of Christmas} DIY Hot Cocoa Gifts


Oh man, the 17th day of Christmas almost never was!  I was so busy shopping today I ALMOST forgot about my blog post.  But don’t worry.  I remembered. 

What’s the best thing to come home to after a long day of Christmas shopping (aside from a glass of champagne and a spa treatment)?  A nice warm mug of hot chocolate.  Hot chocolate is not only the perfect winter treat, but also makes a great gift or stocking stuffer.

Behold an amazing recipe for hot chocolate, courtesy of Alton Brown (cayenne pepper, who knew??)

Ingredients

  • 2 cups powdered sugar
  • 1 cup cocoa (Dutch-process preferred)
  • 2 1/2 cups powdered milk
  • 1 teaspoon salt
  • 2 teaspoons cornstarch
  • 1 pinch cayenne pepper, or more to taste
  • Hot water

Directions

Combine all ingredients in a mixing bowl and incorporate evenly. In a small pot, heat 4 to 6 cups of water.
Fill your mug half full with the mixture and pour in hot water. Stir to combine. Seal the rest in an airtight container, keeps indefinitely in the pantry. This also works great with warm milk.

And here is a little packaging inspiration:

Top Row: S'mores Cocoa Cone / Hot Cocoa in a Can (get the can for $1 at Target!)
Be sure to check back daily for holiday inspiration!  As a special treat to my readers, I'm offering a 10% discount in my Etsy store with the discount HOLIDAY10.

Sunday, December 16, 2012

{25 Days of Christmas} Chicago at Christmas: Zoo Lights

What could be better than Christmas lights paired with baby gorillas?  NOTHING. I know that going to the zoo during the winter seems illogical, but both zoos in the Chicagoland area put on some pretty amazing Zoo Lights. So if you feel like braving the cold (or really not so cold weather...) head on over to a zoo or two.

Every year I try to get to Lincoln Park’s Zoo Lights.  It’s free.  Santa is there.  Not to mention, this year there are two new baby gorillas (and a baby zebra!).  Count me in.


Source: LP Zoo
 The lights are presented by ComEd and Charter One.  As mentioned previously it is FREE.

Dates: 21-23, 26-31, January 1-6

Hours:  5-9 pm

Address:2001 North Clark Street · Chicago, IL 60614

For more information visit the Lincoln ParkZoo Website, or call 312-742-20000


 While highlighting the zoos in the city, I can’t fail to mention the mothership, Brookfield Zoo. I would love to make it to Brookfield Zoo’s holiday magic this season, but alas I must only choose one. However, that doesn’t mean you can’t enjoy the Great bear wilderness and nightly dolphin show!
Holiday magic runs the remaining weekends in December (12/22, 12/23) plus  12/26-12/31


Hours: 4:00pm-9:00pm

Regular Zoo Admission + Parking Fee apply (womp womp):Children (3-11) $10.50 Seniors (over 65) $10.50  Adult (12-65) $15.00

Address:
3300 Golf Rd, Brookfield, IL 60513

For more information visit the Brookfield Zoological Society’s Website


Saturday, December 15, 2012

{25 Days of Christmas} Chicago at Christmas: High Tea


As I sit here watching it rain and NOT snow outside, I’m going to once again suggest a fun thing to do at Christmas in Chicago.  Maybe it doesn't quite look or feel like Christmas in the city, but there are some things you can do to up your holiday cheer. 

Today I’m highlighting the Drake Hotel’s afternoon holiday tea.  I had the opportunity to go with my grandma a couple weeks ago, and very much enjoyed it.  While sipping on chocolate mint truffle tea, and nibbling an egg salad on brioche, I felt nothing short of English. All I needed was a proper English hat and the experience would have been complete (Kate Middleton, not Princess Beatrice style…)
So while the tea is not just a holiday event, it surely is something that is best experienced at Christmas time.

Source: emilia-jane.com

Source: emilia-jane.com

Source: emilia-jane.com

Source: Drake Hotel

The Deets:

Afternoon Tea takes place daily in the traditional Tea Lobby, featuring live harp music performed 365 days a year. Each seating lasts approximately an hour and a half and reservations are recommended.

Open Daily 1 p.m. to 5 p.m.

Address:
140 East Walton Place
Chicago, IL 60611

For more information call 312.787.2200 or visit The Drake Website

Pin It button on image hover