Showing posts with label Wreath. Show all posts

Thursday, December 13, 2012

{25 Days of Christmas} Silver Thumbtack Wreaths


Are you ready for ANOTHER wreath tutorial?  I hope you said yes, because that is what you are about to get.  This entire project only cost me $8 in supplies, since I had most of it on hand (it didn't actually cost me any money since my mom picked me up the thumbtacks, thanks moms!!!)


So anyways, I saw Madigan Made’s thumbtack wreath a while ago and have been jonesing to make one for myself.  What better time than Christmas?  The best part about this tutorial is that the wreath is versatile and can be hung during virtually any season; the little thumbtacks almost give a snakeskin/hammered metal appearance.  Loves it!

Disclaimer:  I cannot be held responsible if at the end of this project you get the urge to stab someone with thumbtacks and rip your fingers off.  It is super repetitive and boring, but sitting yourself down with a glass of wine and the movie elf may help to alleviate the monotony.

Materials:
-Cardboard
-Magazines/Newspaper
-Duct Tape
-X Acto Knife
-Silver Thumb Tacks (My 3 6” wreaths used 750 tacks all together, tacks are available at the Dollar store typically in boxes of 200 or 300)
-Ribbon for hanging

Directions:
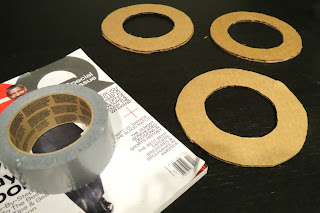
1. I used the same steps to make a wreath form as I did with my moss wreath.  First, I printed off a 6” circle using Microsoft publisher, then I glued the cut out to the cardboard.


2. Carefully cut out the cardboard shape using the xacto knife. (Do this 3 times to make 3 cardboard wreath bases).  Obviously if you're lazy you can buy foam wreath forms, but I'm cheap and am trying to be green.

3. Crumple up newspapers and magazines, then tape the magazines to the cardboard using the duct tape.  Try to make all 3 wreaths uniform in shape and size.

4. Start poking the thumbtacks through the wreath form.  No glue necessary.  I didn't have a specific pattern, however I found it easiest to work from the inside of the form outward.

5. Continue this process until the entire wreath is covered in thumb tacks (each wreath used around 250 tacks).
6. Optional:  Get your favorite holiday ribbon, make a bow and tie around the wreath for hanging.

And here they are!  Even the boy liked them.  I would say that is a success!


Be sure to check back daily for more holiday inspiration!  As a special treat to readers, I'm offering a 10% discount in my Etsy shop, just use the code HOLIDAY10!

Monday, December 3, 2012

{25 Days of Christmas} $3 (or less) Moss Wreath


I know what you're thinking, wreaths two days in a row???  But really, this baby looks adorable, and didn't cost me any money since I already had all of the products on hand.  Even if you have to buy the moss and the ribbon (you probably already have the other materials) this makes for an adorably inexpensive  holiday decoration (Consider changing the bow to transcend holiday seasons, moss wreaths are perfect for the spring!)

Materials:
-Old Magazine Pages/Newspaper
-Cardboard
-Tape (Preferably dark green, but any color will do, I used silver duct tape and it worked just fine!)
-Elmers Glue
-1 package of moss (available at the Dollar Store, I had mine leftover from my terrarium project)
-Ribbon (Optional)

Let me preface this by saying that you can obviously buy a wreath form and cover it with moss and glue, but if you want to be like me a scour your apartment floor's recycling bin, then your best bet is to go the cardboard/magazine route, since it's free!

Steps:
1. Cut the cardboard into desired size.  I used a shape print out in Publisher, and traced/Exacto knifed the cut out.


2.  Crumple up sheets of newspaper or magazines and arrange them around the wreath form


3. Tape the magazine pages to the wreath form.  Fill up blank spaces with small pages of newspaper or magazine.  Try to make the entire wreath uniform.


4. Apply the elmers glue to the wreath form.  I spread the glue thinly around with my finger, then applied the moss directly onto the glue.  If the moss is in clumps, pull it gently to stretch it out in order to get more coverage.
Sorry, my fingers were too gluey to take a picture!

5.  Apply small leftover fragments of moss to any bare areas.  This is why the green tape would work best, as it would conceal any bare spots, however mine were none too noticeable even with the silver tape

6.  Apply a bow, and voila! Hello Freebie/Cheapy Beauty!


Decorations don't have to be expensive in order to make a statement!   As a big thank you to my readers, I'm offering a 10% discount in my Etsy shop, just use the code HOLIDAY10.  Be sure to check back daily for more holiday tips and instructions.
Pin It button on image hover